Moyenne des notes
Frais de ports offerts dès 50 € jusqu'à 1kg
Boutique en ligne de perles et accessoires pour la création de bijoux DIY et autres loisirs créatifsSe connecter
0
Panier
Panier

Comment réaliser une bague en soutache ?
Si vous aimez les bijoux élégants, découvrez ce tutoriel qui détaille pas à pas la réalisation d'une bague avec de la soutache. Avec un peu de patience et d'entraînement, la soutache n'aura plus de secret pour vous !
Connaissez-vous la soutache ? Il s'agit d'un galon étroit, plat, tressé et texturé que l'on retrouve traditionnellement au rayon mercerie et passementerie. À l'origine utilisée dans l'ornement de vêtements ou d'abat-jour, la soutache connaît aujourd'hui une renaissance avec la tendance des bijoux textiles et du Bead Embroidery. Dans ce pas à pas, on vous propose d'utiliser de la soutache de fabrication française, agréable à travailler grâce à sa bonne tenue. Elle est idéale pour la confection de bijoux brodés.
Un grand merci à Martha Mollichella pour la réalisation de ce pas à pas et retrouvez nos autres tutoriels bijoux confectionnés avec de la soutache.
À noter : Pour l'instant ce tutoriel vous est proposé en anglais et en italien. La version française arrivera prochainement, mais grâce aux nombreuses photos du tutoriel, il est facile de suivre les étapes rédigées en anglais.
1) Cut two squares of stiff stuff ( 3,5 cm to each side);

2) Make a cross cut in the middle;

3) Make a semicircular cut starting from the middle, this is the base where we will start to work. It is very important to achieve a "slot" in an oval shape; so that the cabochon will be not too tight or too wide; as it has a certain depth;

4) Stick the cabochon onto the stiff staff, taking great care not to dirty the cabochon with glue. I suggest you do this in the evening and let the glue dry all night long; We begin to embed our cabochon: take one meter of Miyuki thread, tie a knot, get below and above the stiff staff and exit adjacent to the cabochon. Take two Rocailles 11/0, gently place them at the edge of the cabochon and fall under the stiff staff, immediately after the second bead inserted;

5) At this point exit with needle, at the center between the first and the second bead inserted;

6) Get out from the second bead inserted;

7) Insert two more Rocailles 11/0 and go back from top to bottom to stiff staff immediately after the fourth bead inserted, always making sure to stay to the side at the edge of the cabochon;

8) Re-enter from below to above the center of the four beads. This point is called "back stich two" and is used to embed cabochon small as these PureCrystal Oval;

9) Insert the needle and thread in the third and fourth bead;

10) Continue with the "back stitch two" for the entire perimeter of the cabochon. Check for safety that at the end, the number of beads added is always even. Obviously inserting always two beads this should be obvious, but it is always best to double check. Beads must be even to continue embedding the cabochon with "circular peyote tecnique."

11) Now we will add 15/0 beads using circular peyote tecnique, exiting (and starting) from an 11/0 bead previously entered, (this is called step up). Take one 15/0 on the needle, and insert the needle in the next 11/0. Continue in this manner all the way round and then make the step up; After the step up, make a second round with 15/0;
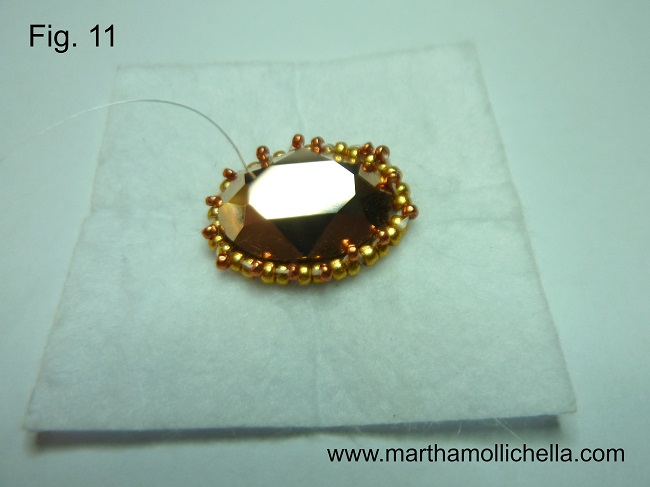
12) Make third round and this is the embedded cabochon result;

13) Take one piece of PureCrystal rhinestone chain and measure the length needed to the outline of the embedded cabochon. The more the bezels will be closer together, the more beautiful will be the work.

14) Put little bit of glue on a toothpick and spread it on the stiff staff around the embedded cabochon; lay down the chain and let it dry and just sew each two bridges, as in the picture.

15) So far we have worked with Miyuki thread. It is time to replace it with the Fireline. You can also continue using Miyuki thread in the same soutache colour but I prefer Fireline because it is transparent. Take a meter of fireline, tie a knot, get into the stiff staff adhering to the perimeter of the cabochon. Take 12 cm of pink soutache and go right at the center of the groove of the soutaches strip;

16 and 17) Re-enter with a small point inside (toward the cabochon);


18) Indent vertically now in stiff staff, adjacent to the cabochon and go back over more and adjacent to the cabochon;

19) After repeating the point 16 and 17 making small points, you will have surrounded Half cabochon and repeating the same point taking 12 cm pink soutache, make the same for the other side of the cabochon as shown;

20) Join the two ends of soutache stripes, sewing each others as shown in figure. Do not cut the thread.

21) Cut stiff staff in excess;

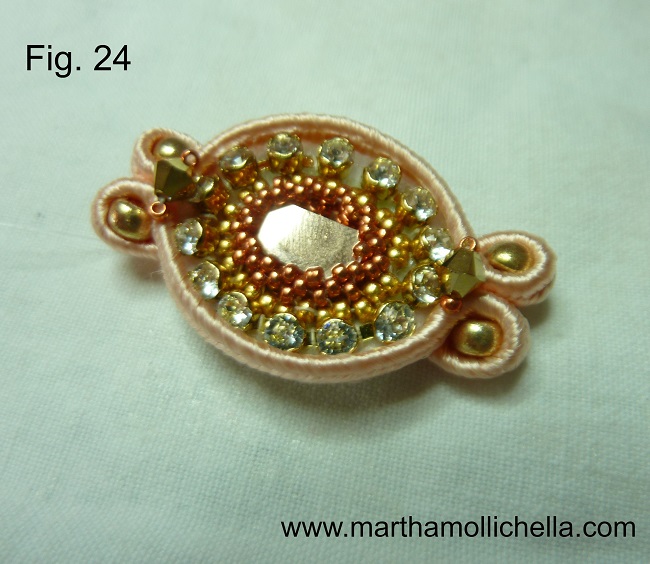
22) Add 6/0 beads as shown in the image; Sew the stripe on the back; Cut stripes in excess and if too frayed, stop them with a drop of glue;

24) Sew 15/0 Seed Beads bicone and 15/0 as shown
25) Now needle one 6/0 and take 9 cm of the others two soutache colour (I used the light pink peach, brown and terracotta) and align along the same direction. As you can see, the soutache stripes are composed of woven fibers and in their length form a V. We must follow this V verse. Needle right at the center of the groove of the soutaches strip;

26) Re-enter with a small point inside.

27) continue with small point;

28) go back with the needle;

29) Sew a 8/0 bead between the two soutache stripes;

30) and 31) continue sewing 4 8/0 on the left of the 6/0 and on the right.


32) Make the same thing on the opposite side;

33) Take a piece of ultrasuede.

34) make a cross cut in the middle

35) Insert the ring base inside the cross cut;

36) this is the front view

37) glue the module on the base ring and ultrasuede.

38) Cut stiff staff in excess.

39) Now we begin to refine the ring with brick stich tecnique. I personally prefer to finish all my work in brick stitch because this type of finishing (which allows you to stitch together the back and front together) ensures stability and durability to work. Exit from ultra suede and add two beads Rocailles 15/0; Retract in the ultra suede and stripes and get it second bead inserted; The bead has to lay in the border between the ultra suede and soutache stripe. The first beads inserted will remain soft and not in place. Do not worry, it will be settled when you insert the final bead; for futher information you can google brick stich.


NB : Attention, la liste de produits ci-dessous n'est pas totalement conforme à la photo de présentation. Pour des raisons de stock, certains produits de ce tutoriel ont été remplacés par des équivalents.


Vous avez une question concernant ce tutoriel ?
Posez-la à notre équipe et aux personnes qui l’ont déjà testé. La communauté Perles & Co est là pour vous aider !
Crédits
Perles & Co société Internet & E-Commerce [31/05/2017]
Toute reproduction, représentation, adaptation, sous quelque forme que ce soit, même partielle, sont interdites, sauf la reproduction à usage privé non destinée à une utilisation collective, la représentation dans le cercle familial (art. L 122-5 CPI) et la mise en ligne à condition d’en mentionner la source et d’inscrire un lien vers la page correspondante de notre site www.perlesandco.com.